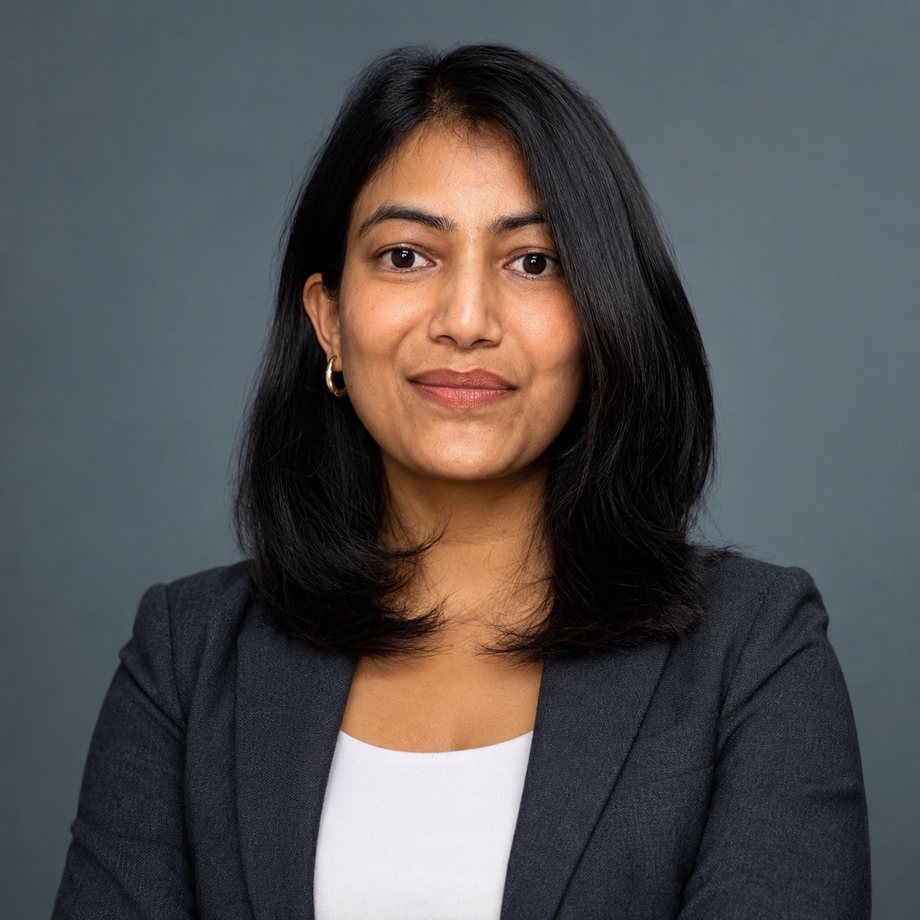
I first shared this prompt on Instagram, and it spread further than anything I have ever made. Watching other creators and thousands of you recreate it, tweak it, and post your own versions has genuinely been my favourite thing this year.
I still get DMs about it every week, which is why I finally wrote the complete version down. This is the original, plus everything I have learned since about getting it right. Here is the reel that started it.
What is in this blog
1. The input photo rules nobody mentions
This is where almost every failed attempt actually fails. People blame the prompt when the problem was the selfie they fed it. The model can only preserve detail that exists in your source image, so a blurry photo gives you a blurry stranger.
Before you write anything, find a photo where:
- Your face is in focus and reasonably large in the frame. A group photo cropped down to your head will not work. The model has nothing to preserve.
- You are lit from the front. Window light is perfect. Backlighting puts your face in shadow, and the model will invent the details it cannot see, which is exactly when you stop looking like yourself.
- Nothing covers your face. No sunglasses, no hand on chin, no hair across one eye.
- Your expression is neutral or lightly smiling. Extreme expressions carry over in strange ways.
- It is recent. Obvious, but a photo from six years ago produces a headshot of a person your interviewer will not meet.
A plain, well-lit selfie taken against a blank wall beats a professionally shot photo that is dim or low resolution. Sharpness and even light matter more than the setting.
2. The prompt
Paste this into an image model, attach your reference photo, and send. It works in ChatGPT, Gemini, and any image tool that accepts a reference image.
Create image

Hyper-realistic professional headshot of the person in the reference image, preserving their facial features and likeness. Square 1:1 composition, chest-up, face filling the frame with tight headroom. Direct eye contact, slight genuine smile, approachable and confident. Wearing a tailored charcoal blazer with visible texture. Clean studio background in soft muted blue-gray for strong subject separation. Soft overhead softbox lighting, natural catchlights in the eyes, realistic skin texture with visible pores and fine hair detail. Shot on an 85mm lens at f/2, smooth background blur. Modern, clean, warm color grade.
3. Why each line is in there
This is the part that usually gets stripped out when the prompt gets passed around, and it is the part that actually matters. If you understand what each clause is doing, you can adapt it instead of hoping it works.
-
preserving their facial features and likenessThe single most important instruction. Image models drift toward a generic attractive average unless you explicitly anchor them. Without this line you get a good-looking person who is not you. -
Square 1:1 composition, chest-up, tight headroomLinkedIn displays your photo as a small circle. A wide shot means your face ends up tiny and unreadable at thumbnail size. Square and chest-up means your face survives the crop. -
slight genuine smileBoth words are doing work. Drop "slight" and you get a toothy grin that reads as a stock photo. Drop "genuine" and you get the dead-eyed corporate smile everyone recognises instantly. -
tailored charcoal blazer with visible textureCharcoal is neutral across every industry and photographs well against most backgrounds. "Visible texture" is the important half: without it, AI fabric renders as a flat plastic shape. -
soft muted blue-gray backgroundEnough contrast to separate you from the backdrop, muted enough that it never competes with your face. Pure white blows out and looks like a passport photo. -
natural catchlights in the eyesCatchlights are the small reflections of the light source in your pupils. They are the difference between eyes that look alive and eyes that look like a doll's. Almost nobody includes this, and it is the fastest tell that an image is AI. -
realistic skin texture with visible pores and fine hair detailImage models over-smooth skin by default. This line is what stops the airbrushed, waxy look that makes a photo obviously synthetic. -
85mm lens at f/2, smooth background blur85mm is the actual focal length portrait photographers use, because it flatters facial proportions without distortion. f/2 gives the shallow depth of field that separates you from the background. This one line is doing most of the work of "looks like a real photographer took it." -
warm color gradeWithout it, output skews cold and clinical. Warmth reads as approachable, which is the entire job of a profile photo.
4. Variations for your industry
The base prompt is deliberately conservative because it has to work for everyone. Adjust the wardrobe and background, and keep everything else identical.
- Tech or startup: swap the blazer for "a well-fitted plain crew-neck sweater in a muted tone" and the background for "soft warm gray."
- Finance, law, consulting: keep the blazer, add "with a crisp white collared shirt," and use "deep neutral gray" for the background.
- Creative or design: try "soft muted sage" or "warm terracotta" for the background. Keep the lighting instructions untouched.
- Healthcare: swap in "a clean, simple top in a soft neutral" and keep the background very light.
Change one thing at a time. If you rewrite half the prompt and the result is worse, you will not know which change caused it.
5. When it comes out wrong
Four failure modes cover almost everything people run into.
It does not look like me
Your input photo is the problem nine times out of ten. Go back to section 1. If the photo is genuinely good, add this to the end of the prompt: "Keep the face identical to the reference image. Do not alter face shape, nose, jawline, or eye spacing."
The skin looks plastic
Strengthen the texture instruction: "Photographic skin texture with visible pores, fine lines, and natural imperfections. Do not smooth or retouch the skin." Telling it explicitly not to retouch works better than asking for texture alone.
The smile is too much
Replace "slight genuine smile" with "relaxed neutral expression with a hint of warmth in the eyes."
It looks like a stock photo
Usually the background is too clean and the pose too centred. Add "slight natural asymmetry in posture, head turned a few degrees off centre." Perfect symmetry is what makes an image feel manufactured.
6. The line you should not cross
Here is the part I care about most, and the part that gets left out of every version of this I have seen.
An AI headshot that does not look like you will cost you more than a bad photo ever would. You will get on the video call, and the person on the other end will spend the first thirty seconds quietly recalibrating. That is a genuinely bad way to start an interview, and it is entirely avoidable.
A real photographer would fix your lighting, your framing, and maybe your collar. They would not change your face. Use AI for the things a photographer controls, not the things they cannot.
Concretely: adjust lighting, framing, background, and wardrobe as much as you like. Do not change your face shape, your skin tone, your age, or your body. If you would not recognise yourself in a lineup from the photo, start again.
The goal is not to look like someone else. It is to look like you on a day when the lighting happened to be excellent.
7. Uploading it to LinkedIn properly
You did the work, do not lose it at the last step.
- ✓Check it as a circle before you commit. LinkedIn crops round and shows it small, so if your face does not read at that size, recrop tighter.
- ✓Upload the highest resolution you have, at least 800 by 800 pixels. LinkedIn compresses on upload, so give it room.
- ✓Use the same photo on LinkedIn, your resume, your email signature, and your portfolio. Recognisability compounds.
- ✓Update your banner while you are in there. An empty banner next to a sharp new photo looks unfinished.
Your photo gets someone to stop. Your headline and About section are what make them message you. If the photo is the only thing you fix this week, you have done a third of the job.
Photo sorted. Now the rest of the application.
A great headshot gets you looked at. What gets you interviewed is a resume that matches the job description. PinkaHireAI reads the posting, scores your fit, and rewrites your bullets to match, then writes the cover letter, the cold DM, and the follow up.
Try it free for 3 days → No credit card needed.